Sunday, November 30, 2014

Home Again At Last

 As nice as it is to visit family, nothing quite beats the feeling of being home again.  I was just rounding the second corner of the border on my little blue Dear Jane quilt when we exited the highway toward our house.  
 I felt the urge to sew a bit when we got home, so I drafted this test block for a New York Beauty quilt that has been running through my mind.  I need to get a bigger compass, so this little guy is just 6 inches, the biggest size I can make with the geometry compass and protractor I borrowed from the kids' school supplies.  I meant to make the darker orange spikes on the inside.  Oops.
So Thanksgiving was interesting.  My sister was due to host this year.  My family was scheduled to host last year, but ended up driving to North Carolina instead when Kurt's mom was diagnosed with lung cancer.  My sister came down anyway and went to Disney, but we never got to see each other.  Well her youngest son Zac has been in the hospital for the last three weeks with a variety of life threatening illnesses.  So instead of going to her house for turkey on Thanksgiving, we all ate at the hospital and visited with Zac.  While we were there, they decided that they were going to do open heart surgery to replace a valve that had been eaten away by infection.  So we took the oldest two with us to Kurt's brother's house and hung out with them while the surgery was going on.  The surgery went well, they got a new mitral valve installed and patched up another area that wasn't fairing so well.  Turns out he had a hernia as well so they fixed that up while they were in there.  We were planning to head home yesterday because Kurt was supposed to be leaving for India today, but his visa has been delayed and we get to keep him for a few more days.  Yeah!
Can I just say how nice it is to be home again with nothing exciting going on?  We are all planning to settle in for a quiet evening of leftovers and maybe a movie.  As tempted as I am to run out for some quilt block drafting supplies, it just feels too good to be home again. 

Handwork

Doing a little appliqué in the car.  I have some hand quilting for the afternoon.

Saturday, November 29, 2014

Last Light Blue Day

Today is the last official "light blue" scraphappy Saturday.  I know that a lot of us are already starting to finish things off though!  Yeah!  Feel free to post your last bits of blue, or the beginnings of the finishings.  There will not be a new color for December, so if you need a 12th color for the last block of your quilt, feel free to fill in with whatever you have the most of.  I've seen some lovely golds, lime greens, burgundies...... There are so many shades we have not had time to delve into this year.  We also didn't have a light neutral month this year, so that is always an option for people looking for a broader range of colors.
Because we are getting ready to start the LAST month of the year, I am also holding a drawing for the final RSC14 fabric giveaway of beautiful hand dyed fabric by Vicki Welsh.   To enter the drawing, leave a comment please with the name of one quilt block you would most like to see incorporated into next year's rainbow scrap challenge project.

I've already received the fabric for RSC15 and I am SO EXCITED to get started on the new challenge quilt!  Vicki will be posting more details about the fabric in her December newsletter for those thinking about joining in, and I'll try post some of the details and plans at about the same time.   I can't reveal everything of course, what fun would that be?  You are also welcome (of course) to use your own fabrics (hopefully scraps), but Vicki is going to have special packages available for those who are interested.
Don't forget to leave a comment to enter the drawing.  I'll check in as soon as I'm back from my turkey travels.  As I'm scheduling this to post ahead, I should be back pretty soon to see what lovely projects are starting to come together.  I'll draw for the fabric winner before next Saturdays post.

Thursday, November 27, 2014

Thanksgiving Doodles

Hanging out with family sketching quilts.  Hope you are all having a great day.

Monday, November 24, 2014

RSC Sampler Progress

I was so happy to get my RSC sampler blocks done early and thought I would rush to the finish before everyone else.  Live happens though, and I am still plugging away slowly.

I was trying for a diagonal, corner to corner placement of colors.  It didn't work out perfectly of course, but in general, the top left corner was brown, next came pink, purple blue, teal, green, light green yellow, orange, and red.  Black filled in the bottom right corner.  I had 100 blocks, so I chose a 10 by 10 setting which should end up with a queen sized quilt after the sashing strips and borders are added.
I chose this light and dark grey fabric from Connecting threads for the sashing.  I think it would work in light and dark ivory or cream as well, but I was going for "modern".  Not my specialty, but I am branching out.
So I had seen an alternating split light and dark sashing and wanted to try for  a similar effect.  I started by cutting strips of dark and light fabric that were 3 inches wide.  I cut these into 3.5 inch rectangles and pieced them together to make a 6.5 by 3 inch sashing strip.  I sewed 90 of these split strips.  Of course it occurred to me later that it would have been more efficient to cut 3.5 inch wide strips, and sew them together before sub cutting them into 3 inch widths.  I guess that would have been too easy though!
The rows were divided into even and odd.  The odd rows had the sashing strips sewn between each block with the white facing down toward the bottom of the quilt.  The even rows had the sashing strips sewn in between the blocks with the white facing up toward the top of the quilt.  

The horizontal sashing strips are in progress now.  5 horizontal strips are light and 4 are dark.  Each takes two 3 inch width of fabric (WOF) strips sewn together.  Those are trimmed to 83 inches, which should be the width of the quilt  (10 six inch finished blocks plus nine 2.5 inch finished sashing strips and 2 quarter inch seam allowances on the ends).  
The first white strip goes between rows 1 and 2 with light and dark alternating down the quilt, ending with light between rows 9 and 10.  I've gotten as far as rows 1 and 2, but I am loving how it looks so far!  
The border will just be a slightly wider continuation of the same pattern.  Grey will frame the top and bottom -- 4 or 5 inches perhaps.  Then I'll have to do alternating blocks of light and dark for the side borders to continue the effect of the "split" rows.
I'll do a real tutorial when I have it all together, but I think you could get started if you are planning on a similar setting.  People are doing all sorts of different finishing so far.  So much fun!
I had the nicest comment from Pamela who is a "no-reply" blogger.  She just found the RSC Sampler from a Facebook post. (Thanks Andee!).  Anyway, she was having trouble with three of the links from the RSC Sampler tab at the top of the page.  I fixed those and they should be working now.  Please let me know if there are any other issues or questions.  
I am SO much enjoying seeing all the samplers starting to come together.  Angie commented that I must feel like a mother hen.  I really do feel so proud and am enjoying all the wonderful block collections and projects that you are creating from SCRAPS!  
Congratulations to ALL the participants and followers.  What a wonderful challenge this has been for these last few years.  Even more great scrap using projects are already in the works for next year, so I hope you will all think about joining in -- again or for the first time.  

Sunday, November 23, 2014

Quilting with Friends

Sherie, my good friend from work, went to work part time this year and has taken up quilting.  She chose a tutorial from Oh Fransson for a New Wave Tumbler quilt.  She's been bringing it in to work for help along the way, and when it was done, I invited her over to finish it off with some quilting.
After a few practice runs on scrap fabric, she decided on a loop pattern that alternated up and down in the tumbler parts.   With just a little help from me she had it all quilted up and ready for finishing touches.  So much fun!  

Saturday, November 22, 2014

Tiny Bits of Blue

 I haven't gotten much done on my baby blues.   They are ironed now.   Just a few more bits to sew together though and I'll have enough giant postage stamp blocks for a quilt.
 Not a lot of sewing time lately though.  We had company last weekend.  Kurt's parents visited on the way home from a cruise.  We'll see them again next week for Thanksgiving.
The kids had another weight lifting match.  They both improved since the last match, so that was lots of fun.  Today is Lego Robotics.  It is nearby, which is good because it is also the middle school play.  Ryan will have to leave early because he is the prince in the first show and the frog in the second show.
On Sunday a friend from work is coming over to quilt a top on my frame.  She used to quilt years ago, but has just started to work part time and has taken it up again.  I've been helping her out a bit which has been lots of fun.
Just three days of work this week, with Thursday and Friday off for Thanksgiving.  We've had Wednesday off in the past, but the schedule has changed.  Lots of people are slow to change with the times though, and I think Wednesday will have small classes for sure.
I got a package in the mail this week from Vicki Welsh!  It has all of the fabrics for the giveaways and quilt along for next years Rainbow Scrap Challenge.  They are gorgeous!  Next year the fabric each month will be a gradient of the colors of the month, she will also have them for sale, just in case you don't win.  I'm working on a quilt designed around those fabrics and will post directions each month for anyone who would like to sew along with me.
How are all of your blues coming along so far?  I'm getting pretty anxious to finish off this years quilts so that I can start on the new ones without quilt guilt.
Use the linky below to share your progress with us all.


Saturday, November 15, 2014

ScrapHappy Saturday - Lovin those Baby Blues

 These giant postage stamps have been hanging out since August.  The last block will be light blue.
 The leftovers are waiting to go into this chevron design.
These 1.5 inch strip sets are ready to go, they just need some ironing and a little bit more combining.
Kurt's parents and sister are coming to visit on the way home from a cruise, so the sewing room needs to be changed into the guest bedroom.  First though, I think I can find a little bit of time to finish up just a few blocks.
What are your scrappy scraphappy plans for the day?  Use misterlinky below to share your progress on blue or on the finishing of your rainbow scrap challenge projects for the year.  It is halfway through November already and I'm looking forward to lots of great finishes in the next few weeks.
First though, I was finally able to draw the winner of the hand dyed fabrics by Vicki Welsh for November.  Vicki just finished up a rainbow scrap challenge quilt top this week.  The fabric winner is Barbara at Cat Patches.  She is planning to finish off a Christmas tree wall hanging/table runner before the end of the year.  She has been quilting like crazy in the icy Oregon winter.  It is hard to imagine that snow and ice have already blanketed large portions of the country.  Looks like another cold winter, its a good thing we all have plenty of quilts to keep us warm.

Thursday, November 13, 2014

Trial and Error

I saw a free pattern here, and thought it might work well for next year's RSC project.  The pattern was for a 16.5 inch block though, which is not exactly a scrap friendly size.
I thought I'd downsize it to a 12 inch size.  Obviously it isn't quite right yet.  I used a square in a square calculator that I found here.  I cut the inner squares to 2 7/8 inches, and then used the easy angle for the outer squares.  Somehow, instead of a 4.5 inch unfinished, it was 4 inches unfinished.  I also should have squared it up, and the corners seem to be bigger than the edges.
The girls both thought that the outer corners should match the inner corners, but I thought it might look nice with only the inner corners matching each other.  I'll keep playing with it, I think, but not tonight.  I have a stack of tests to finish grading and my students would be thankful if the grades got posted tonight.  

Saturday, November 8, 2014

ScrapHappy Saturday - Pastel Side of Blue

I'm probably still at my science teacher convention, so I'm scheduling this ahead of time.  I'll check in as soon as I get back again though, and look forward to seeing lots of great final bits and blocks coming together.  I'll choose the fabric winner as well, so make sure you got your comments entered on last weeks linky party.


Wednesday, November 5, 2014

Happy Humpday


I'm off to a science teacher convention for the next few days, so today was my Friday.  I was busy packing when Anna came home with a bag of scraps from my neighbor Sheila. Fresh scraps!  What could be more fun?  I wasn't planning on taking any sewing, but I might change my mind.  Somewhere I have a bunch of handwork that would be nice to have "just in case"  


We are having robotics right now, and then I'm off for drinks with a girlfriend who I haven't seen in too long.  She is a first year teacher and has found that there isn't time for much more than sleeping and working.  So glad she is finally able to take a break from her grading for a few hours!  

Monday, November 3, 2014

RSC Sampler - Zig Zag

I know it is the blue month, but I laid out all my RSC sampler blocks and decided that I needed one more in orange.  So here is a Zig Zag block in orange.  Feel free to make yours in whatever color your quilt needs.
 This block uses just 2 inch strips, so it goes together pretty quickly.  I chose a dark orange print and a  lighter solid orange background.
From the print, cut 4 rectangles that are 2 by 3.5 inches.
From the solid orange, cut 4 - 2 inch squares.
Next layer the 2 inch strips right sides together and cut 4 HST units.
 Sew the HST blocks together, trim the dog ears and press.  Next sew each HST unit to a solid square along the edge with the print fabric.
 Press toward the solid orange and pair this two patch with the print rectangle.
 Sew these together as shown to make 3.5 inch squares.
These should be arranged just like a pinwheel block and sewn together to make a 6.5 inch unfinished square.  

RSC Challenge Sampler - Quarter Log Cabin

There are so many variation on the Log Cabin quilt block.  This one is a quarter log.  You could make a block of course, and cut it into four sections, but when you only need one, this is the way to go.
Start with a 1.5 inch square for the first round.
Round 2 needs a 1.5 inch square and a rectangle 1.5 by 2.5
Round 3 needs a rectangle 1.5 by 2.5 inches and one that is 1.5 by 3.5
Round 4 needs a rectangle that is 1.5 by 3.5 inches and one that is 1.5 by 4.5
Round 5 needs a rectangle that is 1.5 by 4.5 inches and one that is 1.5 by 5.5 inches
Round 6 needs a rectangle that is 1.5 by 5.5 inches and one that is 1.5 by 6.5 inches
Start with the two 1.5 inch squares.  press away from the corner square and then add the 2.5 inch long piece.
You will continue working in rounds by adding the short piece to the side with a seam and the long piece to the adjacent side.

Here is round 3
Working on round 4
Ready for round 5.  Keep going until all the pieces are sewn together
Here is your finished block.  I alternated solids and prints for each round and tried to go from light to dark.  Go crazy and have fun with your scraps!

Sunday, November 2, 2014

RSC Sampler Sashing Progress

I worked most of the morning on sashings for the RSC Sampler Quilt.  All of the rows are now sewn together.  I just need to do some measuring and figure out how to trim out the horizontal strips and add borders.  I'll do a complete tutorial when it is all done, but for now, each section between the blocks is made of one rectangle of light grey and one of dark grey.  Each rectangle is 3 inches wide and 3.5 inches tall.  Those get sewn together longways to make a strip that is 3 inches wide by 6.5 inches tall.  The key to the floating blocks effect is that the rows alternate.  The top row has all the white sections facing down and the second row has all the while sections facing up.  Then a white horizontal strip visually joins the two sections making it seem that the blocks are floating in between two rows.  That is the hope anyway.  Now to find a long tape measure and cut the strips.  We are just now back from Lacrosse and pizza is on order.  Must grade essays tonight, so maybe the quilt will wait until the next free evening pops up.  

RSC Sampler - Double X

This one is a nice simple block to do on a 5 by 5 grid.  Unfortunately, that doesn't translate quite so well into a 6 inch block, so a couple of the measurements are a bit strange, but it goes together really easily after that.
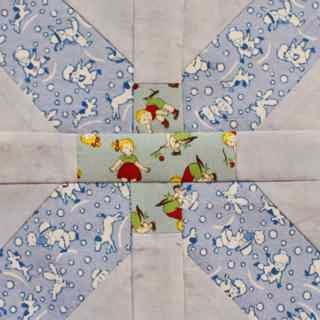
 This block is made of four squares with flip and sew corners combined with a rectangle and some squares forming a cross in the center.
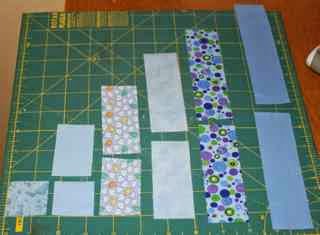
Blue #1, cut 4 - 3 inch squares
Blue #2, cut 1 rectangle -1.5 by 3.5 inches
Blue #2, cut 2 squares -1.5 inches each
Background, cut 4 rectangles 1.5 by 1.75 inches
Background, cut 8 squares -1.75 inches each
(technically the math works out for these to be 1.7 inches, but I can't distinguish .05 inches, so I just rounded up.  If you blocks are just a smidgen too big, you can trim a tiny bit off of the edges of the finished block)
 Place a background square on opposite corners of each 3 inch square.  Draw a line corner to corner and sew on the drawn line to make "sew and flip" corners.
 Press the corner squares open and check to make sure the edges are even before trimming the extra fabric from behind.
 Next, sew background rectangles to each 1.5 inch square as well as each end of the center rectangle.  Press away from the background fabric.
 Sew the short pieced strips between each of the squares.  Check the placement of the flip and sew corners to make sure they are all pointing toward the middle cross.  Press the seams toward the center of the block and away from the angled seams.
Finally, sew the long center strip between the two pieced halves to make the finished block.  it should be 6.5 inches unfinished.  
Marly changed up the measurements to make the edges of the plus meet up with the edges of the x.  Check out her post for revised measurements if you would like the points to match. 

Saturday, November 1, 2014

ScrapHappy Saturday - Baby Blues

I know that blue has already been a color.  We even did a month for blue/greens.  But my blue drawer is STILL overflowing.  So this month we are going to work on whittling down the lighter shades.  Having some light and brights will add sparkle and contrast to the finished quilt.
Because it is the first Saturday of a new month, we will also have a drawing for a lovely bundle of hand-dyed fabric made specially by Vicki Welsh.  To enter the drawing, just leave the name of the one quilt you plan to finish between now and the end of the year.  I will announce the winner next Saturday.

RSC Sampler- Twinkle Star

This one is on a nine patch grid, meaning each unfinished subunit will be 2.5 inches.
You will need 2.5 inch strips of blue and background along with a 1.5 inch strip of contrasting fabric.  I chose  green to help with the transition from blue to green in the finished quilt.
Start with a 2.5 inch strip of blue fabric and use the wide part of the the tri-recs ruler to cut 4 star points.   
The background of the star points will come from the smaller part of the tri-recs ruler.  These will make the "wings".  With the fabric place wrong sides together, cut 4 pairs of wings.

Here are the pieces you will need to cut:
4  - 2.5 inch squares of background fabric.
1 - 2.5 inch square of blue
8 - 1.5 inch squares of green
Using the tri-recs
4 blue star points
8 background wing pieces (4 right, 4 left)

Sew one wing onto each side of the four star point units.  Trim the dog ears and press.  You will need 4 of these star point units.

Next start working on the small green points.  Place a 1.5 inch square in the lower corner of the star point and draw a line from corner to corner.  Sew on the drawn line.
Open up this flip and sew triangle and repeat on the other corner.
The four star points will be in the middle of each side with the blue square in the middle of the block and the background fabric filling in each corner.
Sew together as a nine patch and press.  The finished block will be 6.5 inches.