Friday, October 31, 2014

Slowly it Comes Together

Working on slowly getting all the blocks together.  I'd love to keep going and get it all together tonight, but it is Halloween and we have muck trick-or-treating to accomplish.  I think I'm going to like this!
The outer borders will be a bit wider, maybe 5 inches, but will follow the same pattern.


RSC Sampler Setting Progress

I  have officially finished all 100 blocks for the Rainbow Scrap Challenge Sampler.  Officially!  The remaining blocks are scheduled to appear over the next few days.  Check out the RSC Sampler tab at the top for links to the tutorials or go to Pinterest to see all the blocks.

 So now it is time to move on to setting decisions.  I ordered these two shades of grey from Connecting Threads.  The lighter grey was called parchment and the darker grey is silver linings.
The sashing strips are 3 inches wide.  My husband saw them and said, "Wow, those are really wide!"  Wide is what I was going for.  I'm trying for a more "modern" feel and wanted to give the sampler blocks some space to breath.  With the current arrangement, I should end up with a queen sized quilt.
So the vertical stripes are half light and half dark.  The horizontal stripes alternate between dark and light.  It is supposed to make the blocks look like they are floating in between the stripes. Trick or Treating tonight, but other than that, it looks pretty calm.  Last football game of the season, last Lacrosse game of the season, wonder what will be left next weekend?

RSC Sampler - Wonky Courthouse Steps

This one was leftover from the yellow month, but somehow it just didn't get finished up. As the year starts to wind down, tying up loose ends is all part of the plan.  Feel free to change up the colors as you try to round out your collection to fit your own quilt design plans.
All the subunits can be cut from 1.5 inch strips.  I did mine light to dark from the center out, but you can do yours any that makes you smile.
You will need.
1 - 1.5 inch square of lightest yellow
2 - 1.5 inch squares and 2 - 3.5 inch strips of light yellow
2 - 3.5 inch strips and 2 - 5.5 inch strips of medium yellow
2 - 5.5 inch strips and 2 - 7.5 inch strips of dark yellow.
Start with the 1.5 inch squares.  Sew all three together with the lightest square in the middle.  Press away from the center.
Sew the a 3.5 inch light yellow strip to each side of the center section.  Press away from the center.
Attach a 3.5 inch medium yellow strip to the bottom and top of the center section.  Press away from the middle.  Next, sew 5.5 inch strips of medium yellow to each side of the center section.
Finally!  Last round.  Sew 5.5 inch dark yellow strips to each side and 7.5 inch yellow strips to the top and bottom.  Press all the seams away from the middle.
The block has been made slightly oversized so that it can be trimmed "wonky".   Use your favorite 6.5 inch square up ruler and trip the block up at an angle.
There you go, your finished block will have a jaunty tilt and finish at 6 inches.  

Thursday, October 30, 2014

RSC Sampler - Road to Oklahoma

The last Rainbow Scrap Challenge color for the year will be light blue!  If you still need another color for December, it will be up to you to figure out what color is left in your scrap bin.  We haven't done anything with peach, burgundy, or light neutrals yet.  Any of those would be great choices to round out your collection.  Until then, my blue bin was still overflowing, so I'm working on the pastel end of the spectrum to empty it out a bit more.  I'm really hoping to start putting quilt tops together soon and use Christmas break to put in some time at the quilt frame.
This is a 16 patch, meaning it works on a grid of 2 inch units to make a 6 inch block.
Blue #1 (a light blue) = 4 squares
Blue #2 ( a darker blue) = 2 squares
Blue #5 (background color) = 6 squares
Now place your 2 inch strips of background and Blue #2 together and use the easy angle ruler to cut 4 HST units.
Sew your HST units together, press toward the dark and remove dog ears.
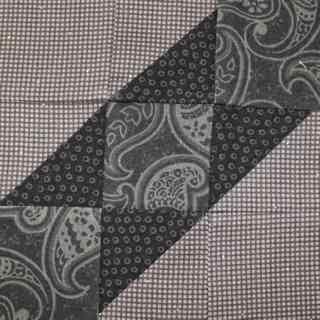
This block needs two subunits.  The first is a simple four patch of light and background.  The second is a little star point made from one dark square, one background square and two HST units.  Check the photo for fabric placement.  Make two of each four patch.
the 4 four patches will go together with the points of each star pointing toward the center and the light blue in a diagonal stripe down the middle
Sew the four patches together as shown.  This one isn't really a star until 4 blocks come together.  It would make a nice leader and ender project with all those 4 patches.  I'm thinking the light blues will add a nice transition to the final quilt so I'm not looking for big flashy blocks at this point.  

Wednesday, October 29, 2014

Mai Tai Sunrise Ready for Borders

 Jo is having a UFO finishing party for everyone working on Bonnie Hunter quilts.  The goal is to finish off an current Bonnie Hunter project before starting the new mystery in November.  So thanks to her motivation I got my Mai Tai Sunrise blocks together this weekend.  Now what should I do about borders?  I could do random strips of rainbow colors, but I'd like to kind of echo the sunrise layout.  Maybe a calming white border first?  Or maybe it should be more blendy?  What do you think?
 Here are the two individual blocks that make up the quilt.  The nine patches are just 2 inch squares sewn leader and ender style over the last couple of years.  They get framed out with rectangles of background fabric and more 2 inch squares.  The stars were a bit tricky to figure out.  Bonnie published the pattern in Quiltmaker magazine in September/October of 2012.  She did traditional cutting directions though, and I really love my rulers.  So after a bit of trial and error, I figured out that the little parts of the star points could come from 2 inch strips with the companion angle, while the big part could come from 3.5 inch strips with the easy angle ruler.  Thanks to a few Bonnie Hunter quilts over the years, I'm feeling pretty good about my ruler math.
Here is a shot from the back, mostly because I love the way quilts look with the sun shining through.  So be sure to head over to Jo's Country Junction to check our more UFO progress and then to Quiltville to look at color suggestions for the new mystery.  

Monday, October 27, 2014

91 RSC Blocks on the Floor

I couldn't resist pulling all of the Rainbow Scrap Challenge Sampler blocks out this weekend to take a little inventory.  91 blocks are made!  Just 9 more to go.  Knowing that has motivated me to get to work on them and try to knock out the last few blocks.  I've already ordered the setting fabric, so nothing can stop me now.  Tutorials for each of the blocks is available on the RSC Sampler tab at the top of the page.  Take a peek if you are looking for 6 inch block ideas.  

Sunday, October 26, 2014

RSC Sampler - Contrary Wife

I just love the names of quilt blocks.  I wonder who in the world came up with Contrary Wife.  Was it the wife or the husband?
 The hardest part of this block was finding three black fabrics with enough contrast to show up against one another.  You could use any shades of black or grey to try to find three fabrics that work as dark, medium and light.  We'll be working with 2.5 inch strips for a nine patch grid on this one.
 Place the light and dark fabrics right sides together and use the easy angle ruler to cut 4 HST units.  From the light fabric you will also need 2 - 2.5 inch squares.  Finally, from the medium fabric, cut 3 - 2.5 inch squares.
 Here is the pattern.  Just a simple nine patch.  The medium squares form the diagonal, with the HST block next, dark pointing toward the center.  Fill in the corners with the light squares.
That's it, just sew the squares together as you would for any nine patch and press.  Your block should be 6.5 inches unfinished.  Getting close!  Just a few more blocks to go!

RSC Sampler - Kentucky Crossroads

I'm on a bit of a roll with states and roads right now.  I wonder what other state themes I can come up with?
 This is another make it big and trim it down block.  Start with a 5.5 inch square of background fabric. You will also need  a couple of 2 inch strips of fabric about 11 inches long and a 2 inch square of contrasting fabric.
 Start by cutting the large square in half from one corner to another across the diagonal to make two triangles.  Insert a 2 inch strip in the center and sew the triangles to either side.  I folded each piece in half and creased along the diagonal to help it all line up.  Press the seams away from the center strip.
 Cut your center square in half again on the other diagonal.  Next cut the other strip in half and insert the contrasting 2 inch square into the center.
 Sew one strip to opposite sides of the square and press toward the center square.  Next, sew the large triangles to either side of the strip, matching the seams which should nestle nicely.
 Your square should be slightly oversized for trimming up.  Use your favorite 6.5 inch square up ruler to get your block to the right size.
Here is your finished block.  It should be 6.5 inches unfinished and ready to go into your quilt.  

Road to Tennessee

Finding just the right blocks to use with exactly the scraps that you have on hand can be kind of fun.  I happened to have several squares of brown, but no more than two of each kind.  This block seemed like a nice way to put them to use.
 You will need four 3.5 inch squares in brown.  They can be the same or different.  I chose two of each --just 'cause that is what I had in the brown bin.  You will also need 8 2 inch squares.
 Place a two inch square on opposite corners of each large brown square and draw a line from corner to corner diagonally.  The lines should run parallel to one another.  You may pin these in place temporarily or place them one at at time, but you will need to sew on the drawn line for each small square.
 Next flip open the small brown corners and press them open.  Check to make sure the corners are nice and straight before trimming off the triangles behind.
All that remains is to  sew the squares together as a four patch.  This one makes a nice alternate block between scrappy 16 patches. Maybe for next year?

Catching Up

I counted sampler blocks yesterday and realized that I just need 9 more blocks before I can put these blocks together.

  So I got up this morning and made three more.  Two were the ones posted by Deb while I was out of town.
The other is a nice simple block called Road to Tennessee.  I'll write up the tutorial when I get home from lacrosse.  Kurt is out of town for work training so I've got kid duty full time for the next few days.
How are your sampler blocks coming along?  Just two more months until it is time to start putting it all together.  Will you be ready?  Check out the RSC tab at the top for a link to all tutorials.  There is also a Pinterest page with photos of all the blocks.  

Saturday, October 25, 2014

Happy Halloween

 We are off to "trunk or treat" at church with our neighbors.  Ryan is a minion, Anna is Raggedy Anne, and Sydney is an angel.  They all made their own costumes this year.  Didn't they do a great job?
First though, I finished putting the blocks together for Mai Tai Sunrise.  I'd love to sit and admire it for a while, or maybe even iron it, but we are off to celebrate fall.  

ScrapHappy Saturday - Dawn to Dusk

As the year starts to wind down, I've been thinking a lot about finishing things up.  Something about the start of a new year makes me want to have all the loose ends tied off.  Well, some of the loose ends at least.  With fall in the air, and Christmas decorations starting to show up in the stores, I'm feeling the urge to start the finishing process on a few things.
How are your rainbow scrap challenge projects coming along so far?  Now is a great time to take inventory and think about how many more blocks you might need.  November will be the last month with an "official" color, with December reserved for putting it all together.
Use the linky below to keep us up to date on your projects.

Thursday, October 23, 2014

RSC Diagonal Strings

It has been a while since we did any string blocks. They are such a good way to use up scraps though.  There are lots of ways to make strings.  I enjoy sewing them on paper, and that would definitely work here, but I was trying to use up some charm squares again and so I cut them into widths from randomly ranging from 1.75 to 1 inches.  I had another charm square in grey and I cut it half from corner to corner along the diagonal.  If you don't happen to have charm squares, collect together some strings that are at least 5 inches long and cut a background square of fabric that is about 5 inches.  Everything is a bit big for squaring up, so don't stress to much about the exact measurements.
The strings in this block are going across the diagonal of a square.  So the length needs to be the hypotenuse of a right triangle.  Given the 6.5 inch unfinished size of the block,  I think about 9 inches will do it.  Go ahead and sew strings at least that long.  10 inches can't hurt.  Press the strings and straighten up the edges.  Mine ended up at a width of 4.5 inches after the trimming.
Sew a grey triangle on either side of the strings and press away from the strings.  Use your favorite 6.5 inch square up ruler to trim away all the extra.

Here's your finished block.  It is 6.5 inches unfinished but will be 6 inches in the finished quilt.  

Monday, October 20, 2014

Design Wall Monday October 20, 2014

I am almost done with the Mai Tai Sunrise blocks.  Almost.  I have extras of framed nine patches, but it looks like I still need 5 more star blocks.  First I'd better get these picked up off the floor before the dog scrambles them though.  Each block is 7.5 inches, so this should be a nice twin sized quilt when it is done.  This is a Bonnie Hunter Pattern from Quiltmaker magazine.  Though, I also saw the star block in a Nickel Quilts book as well.  I didn't use nickel squares, I used 2 inch strips and easy and companion angle rulers.  These blocks have been Rainbow Scrap Challenge blocks for about a year and a half I think, so it will feel great to get them finished off and sewn together.  Hopefully before the new mystery starts after Thanksgiving.
 Most of my sewing time this weekend was spent painting the girls bathroom, so not much was accomplished on the quilting front.
 The bathroom is now a cool and creamy shade of teal that reminds me of mint chocolate chip ice cream.
This is the fabric that they have chosen for curtains and shower curtains.  So no quilts on the horizon quite yet, but the sewing machine will get some action in any case.  I'm linking up with Judy at Patchwork Times, so feel free to head over and see what else is on design walls this week.

Saturday, October 18, 2014

ScrapHappy Saturday - Delving into Dark

I've been playing a lot with brown, but today I feel like black should get a turn.  Now that I'm home again, with all my fabrics and supplies available, I feel the urge to jump in and play.  What dark plans do you have in the works?   Use misterlinky below to share your projects.


RSC Sampler Chevrons

This one has lots of pieces.  It isn't hard, but it does take patience.
Each of the red rectangles is 2 inches by 3.5 inches.  You will need 8, mine are all different.  You will also need 16 black squares, each is 2 inches.  
You will need to sew the black squares on to the red triangles for "flip and sew" corners.  Notice that four angle to the right and four angle to the left.
Next, sew the other black squares to the bottom of each rectangle, with the angles parallel to the direction of the first seam.  Make sure everything is headed in the right direction before trimming away the extra fabric in the corners.  Pressing is going to be important later, so press the seams on the one set toward the black and the other set toward the red.
Pair and uphill and a downhill rectangle so that they angle up toward the center.
When you sew these together into pairs, the seams should nestle nicely if you have done the pressing just right.  If not, feel free to repress to help everything line up.
Now you should have 4 - 3.5 inch squares.
Sew the them into pairs to make two rows.  Press the seams on the top row to the left and the seam on the bottom row toward the right to help them nestle.

Finally, sew the two rows together to make a square.